


Life without Social Media & Instant Messaging is something we couldn't imagine in today's world.
Created a Real-Time Communication app, trying to understand how instant messaging happens with the help of Web Sockets behind the scenes.
🤔 What are Web Sockets ?
🔷 Web sockets are defined as a two-way communication between the servers and the clients, which mean both the parties, communicate and exchange data at the same time.
🤔 Why we need Web Sockets ?
🔷 Imagine playing a online multiplayer game with changing leaderboards, or an instant chatting app like WhatsApp .
🔷 If the communication was carried out using traditional HTTP methods, using page refreshes to send a new request for every changes, Imagine how slow & frustrating it could be !!!
🔷 This is where web sockets comes in.
🔷 The TCP/IP connection is left open for fast, Bidirectional communication until one of the parties leaves the chat.
🤔 Basic elements of Socket.IO Library
🔷 Socket.IO is a library that enables real-time, bidirectional and event-based communication between the browser and the server. It consists of :
- a Node.js server
- a Javascript client library for the browser
🔷 Difference between io and socket objects
iovariable represents a group of sockets. The code begins with providing a function with a parameter ofsocketvariable every time a new connection is made.socketon the other hand, deals in communicating with individual connections.
🤔 Setting up a Server on Backend
🔷 Make sure you have Node.js and Express installed in your system.
🔷 Installation of socket.io library
npm install socket.io
🔷 Initializing the Server with Express
const express = require("express");
const { createServer } = require("http");
const { Server } = require("socket.io");

const app = express();
const httpServer = createServer(app);
const io = new Server(httpServer, { /* options */ });

io.on("connection", (socket) => {
  // ...
});

const PORT = process.env.PORT || 5000;
httpServer.listen(PORT);
🤔 Setting up Socket.io-Client in the Frontend
🔷 socket.io-client is the code for the client-side implementation of socket.io. That code may be used either by a browser client or by a server process that is initiating a socket connection to some other server.
🔷 Installation
npm install socket.io-client
🔷 Initialization
import io from 'socket.io-client'

const END_POINT = 'https://server-domain.com'
const socket = io(END_POINT);
🤔 Basic events in Socket.io
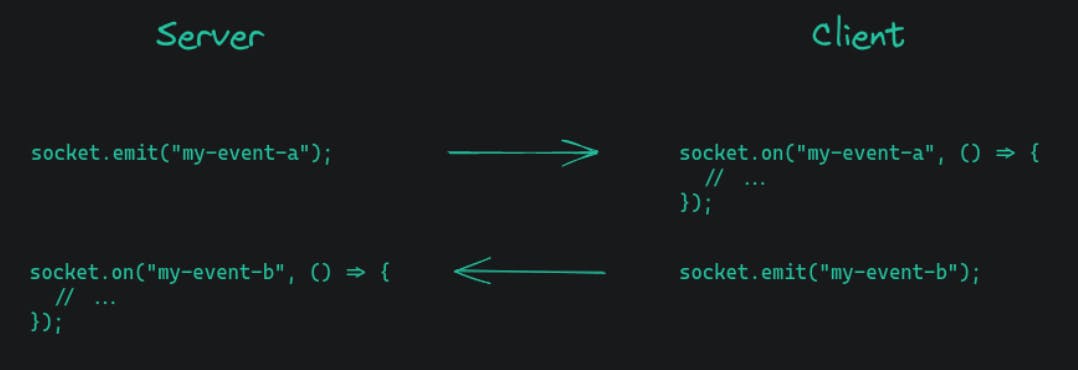
🔷 Listening to Events
- socket.on(eventName, listener) Adds the listener function to the end of the listeners array for the event named eventName.
- socket.once(eventName, listener) Adds a one-time listener function for the event named eventName.
- socket.off(eventName, listener) Removes the specified listener from the listener array for the event named eventName.
🔷 Emitting & Broadcasting Events
- Emitting refers to sending the message to all everyone in the room, including the sender.
socket.on("eventName", (arguments) => { . . . }); - Broadcasting is sending the message to everyone, except the sender.
io.on("connection", (socket) => {
socket.broadcast.emit("eventName", "message");
});
🔷 Rooms in Sockets
A room is an arbitrary channel that sockets can join and leave. It can be used to broadcast events to a subset of clients.
io.to("some room").emit("some event");

//We can emit to several rooms at the same time:
io.to("room1").to("room2").to("room3").emit("some event");
😀 Implementing the Backend of My Chat App.
io.on('connection', (socket) => {

    socket.on('join', ({ name, room }, callback) => {
        const {error, user} = addUsers({ id : socket.id, name, room });

        if(error) return callback(error);

        socket.join(user.room);

        socket.emit('adminMessage', {user : 'admin', text : `${user.name}, Welcome to ${user.room}`});

        socket.broadcast.to(user.room).emit('adminMessage', {user : 'admin', text : `${user.name} has joined the room`});
    });

    socket.on('sendMessage', (message, callback) => {
        const user = getUsers(socket.id);

        io.to(user.room).emit('adminMessage', {user : user.name, text : message});
        callback();
    })

    socket.on('disconnect', () => {
        const user = removeUsers(socket.id);

        if(user) {
            socket.broadcast.to(user.room).emit('adminMessage', {user : 'admin', text : `${user.name} has left.` });
        }
    })
});
😀 Conclusion
The Front-End was created using React with a simple login form. On successful login, it lands up with a display area and a message box.
Here is my application live in production mode,
Source Code :
Client Side Server Side